
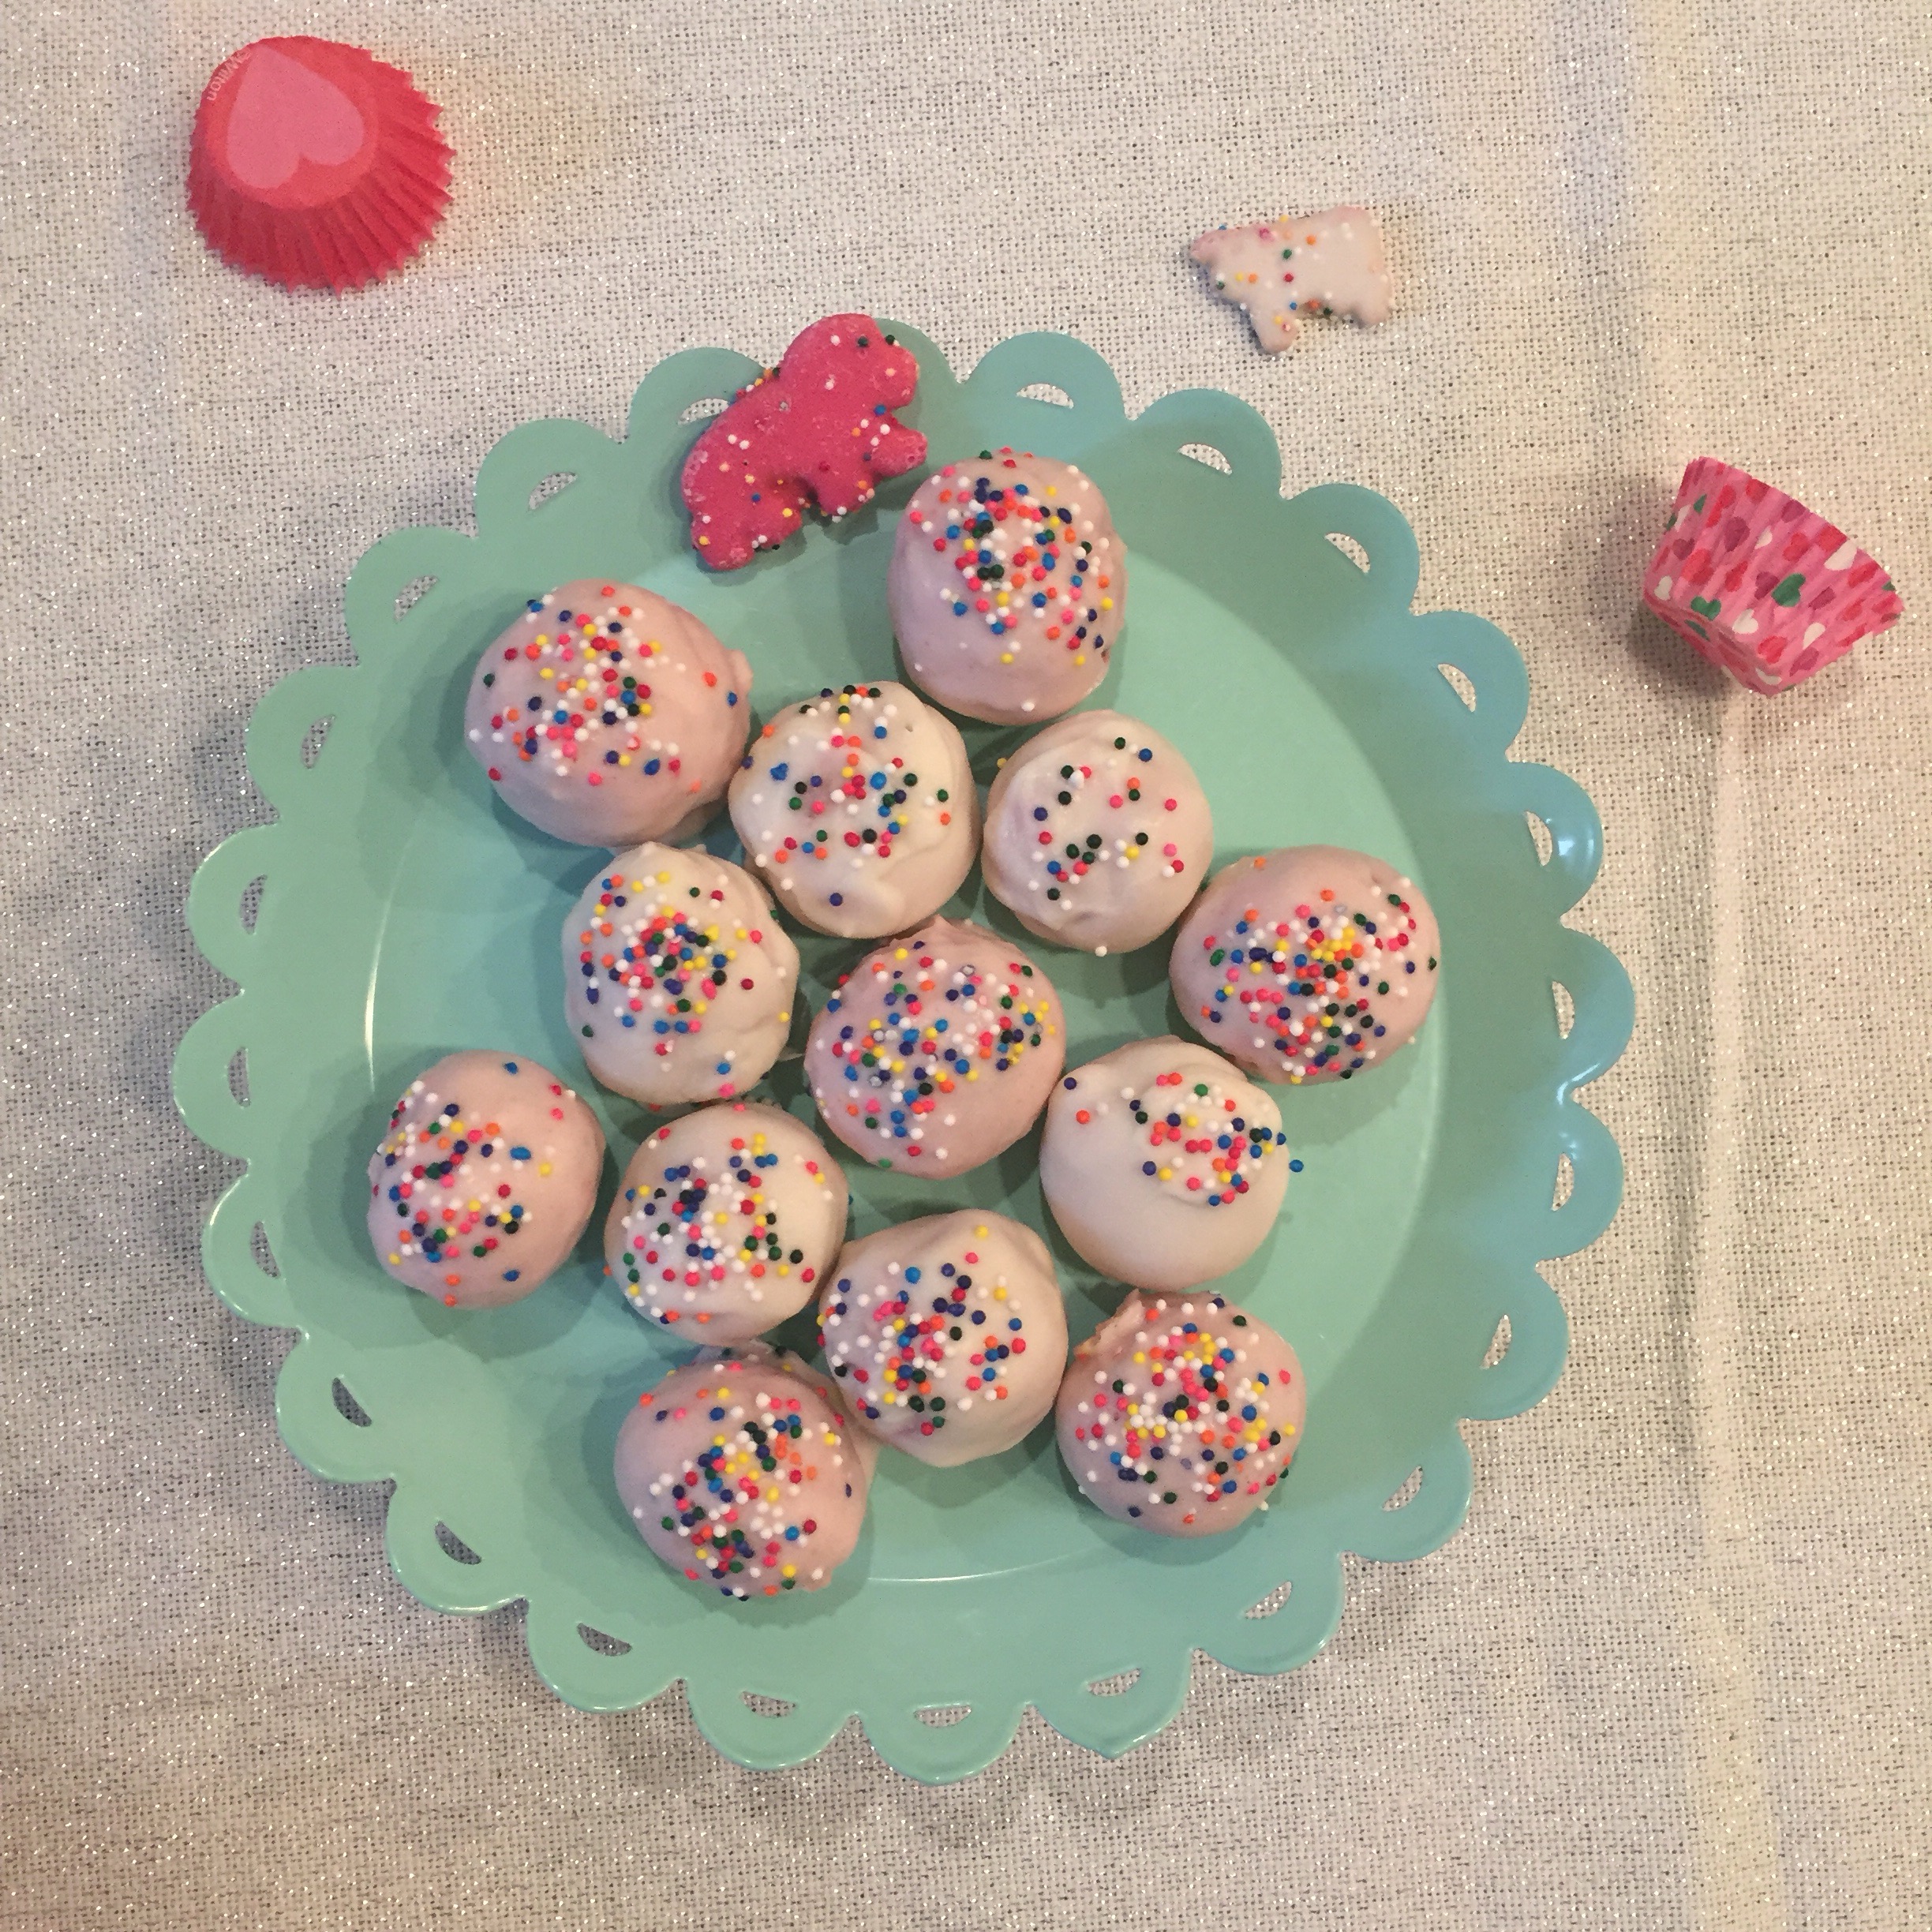
It’s been a while, lots has happened but this weekend I have a friends birthday party and I wanted to gift her something sweet to eat and enjoy at the end of her pregnancy. I have always wanted to make these Circus Animal Truffles and ended up making them last night.


Is there anything better than apple pie?

A simple slice of pie.
I recently went on vacation and returned wanting nothing but apple pie. I’m not really sure where the craving came from but apple pie was on my mind. My first day back from vacation I was doing laundry, putting things back in their places and counting the minutes until I was finished and ready to make my pie.
There’s something comforting about apple pie. Maybe it’s the way it fills my whole house with it’s sweet and homey aroma, or maybe it’s experiencing all the different textures in that first bite, or maybe it’s because I just enjoy damn good pie. Or maybe it’s all of the above!
I began with making the crust. Let me just say that the first try I added too much water to the dough and it wasn’t going to work so I threw it out. I started over with a cup of flour, 2 tablespoons of cold diced butter and about 4 tablespoons of water added slowly and then 1/4 teaspoon of apple cider vinegar. That was just the right amount of liquid. I removed the dough, patted it down in to a disc and wrapped it up and placed it in the fridge for 30 minutes. During this time I peeled my two and a half Honeycrisp apples. Are there any better apples in the world than Honeycrisp?! These are my most favorite apples, ever! I bought three at the store the day I returned even though they were $1.99/lb which I think is absurd but I really wanted them.
I peeled and sliced the apples fairly thin, added a squeeze of lemon juice, some cinnamon (to taste), about a 1/4 teaspoon of vanilla and almond extract for added flavor, a splash of Amaretto Liquor, a dash of Penzey’s Apple Pie Spice and a couple drops of doTerra Wild Orange essential oil. I mixed it all together, added a little bit of flour and let it sit while I rolled out the dough. After placing the rolled dough in the pie pan I filled it with my apples and then mixed some flour, brown sugar and more diced butter together to make a crumb topping.
This pie was perfect! I love it when I can put ingredients together and know that it’s going to turn out the way I want it to. I love that I can put butter and flour, sugar and water together and it makes delicious dough. I love baking applies and breathing in the wonderful smell of them with cinnamon and vanilla. I reluctantly let the pie cool enough so I could cut a piece and enjoy it without burning my mouth, I hate that. That first bite was amazing; the crumbly crumb topping, the warm baked apples with a hint of orange and the perfect crust. It was like heaven….

Apple Pie

The first piece….

Breakfast Pie
And I say again, is there anything better than apple pie?
Go on and make yourself an apple pie, a chocolate cream pie or a pizza pie but get in your kitchen and cook up something you’re in love with and can’t wait to have!
Bon Appétit!
Three Day Challenge: Honey Lavender Ice Cream

Honey Lavender Ice Cream
Yesterday was the last day of my challenge and while it wasn’t entirely stress free it was fun and a pretty interesting experience. First of all I have had an ice cream maker for about 5 years and have never actually used it. This was my chance! I was determined to conquer the ice cream hurdle and make Honey Lavender Ice Cream! I found this recipe by following KitchenAid on Instagram and knew I wanted to try it out. The recipe was posted on their blog and was easy to follow. Of course, I have yet to acquire my Tiffany Blue KitchenAid Stand Mixer yet, if anyone feels like contributing to it’s future purchase, feel free to contact me.
Moving along, so earlier in the day on Sunday I began to make the custard portion of the recipe. I had my heavy cream, whole milk, doterra lavender essential oil, honey and a lemon to zest. I brought everything to a simmer and then let it cook for 15 minutes off of the heat. Then I whisked the egg yolks and tempered them until the cream mixture was now in the bowl with the tempered eggs. Everything went back in to the saucepan to thicken. I added the rest of the ingredients, about 12 drops of my lavender essential oil and got out my Wilton’s food coloring again to make it a light purple. Once it had thickened I strained it and put it over an ice bath constantly stirring to cool it down for about 15 minutes. Once that was done, I covered it and put it in the fridge for about 4 hours until I came home later in the day. I cleaned and washed my ice cream maker and had put the container in the freezer to freeze for later.
Here’s where it gets good! When I was ready to take the custard out of the fridge and went to grab the bowl and it slipped! My glass bowl full of purple custard slipped out of my hand, bounced on the bottom by the fruit drawers and a whole glop of custard flew out of the bowl and draped my door in purple goop….
I left the fridge door open and got out my ice cream maker container in the freezer and put it in the machine. Of course, making ice cream is more important than cleaning up so I continued to make my ice cream. It was my first attempt at ice cream and nothing was going to sideline me now and I was determined to make the best of it, continuing on like Julia! I started pouring or pushing the custard in to the ice cream maker. I churned it for 20 minutes, adding some gold sprinkles to it and then poured it into the other frozen glass container and stuck it in the freezer. I pulled it out and ice cream it had become! Sababa!
Here are some photos of my wonderful, almost stress free final challenge. If you’re wondering, yes I did eventually clean up my fridge door and I let Rex lick the small dollop that fell to the floor. He apparently likes Lavender Ice Cream!

So good you can eat it out of the container.

Gold, sparkly sprinkles make everything better.

Bon Appetit!
My Three Day Challenge has come to and end, I have de-stressed and relaxed a little more since the first challenge. I have made some fun and interesting recipes and learned that just because you have a set back while making something new it doesn’t have to stop you. Making food, cooking, baking, making candy, there’s always something that can go wrong, something that can potentially be stressful to your ‘schedule’ but you just need to choose to see it as a positive learning experience and pick that spoon up, or clean the fridge and get right back to what you were doing. Even if the final product doesn’t turn out the way I want it to, remember the not-so-banana-cream-pie, I won’t let it deter me or keep me from trying it again and getting it right. No excuses!
That’s all for now. Maybe I’ll challenge myself to another three day challenge again.
Bon Appétit!
Three Day Challenge: Stress free Salt Water Taffy

Salt Water Taffy
As you know, yesterday I posted about Day One of my Three Day Challenge. Today I tackle Day Three but I’ll catch you up on Day Two. Saturday I conquered Salt Water Taffy! As you can see from the photo above I made two flavors; Wild Orange and Cinnamon. The recipe was fairly easy, I recommend having a second person around to help with the stretching and pulling if you are making two flavors, but I’ll get to that in a bit.
Here’s where I found the recipe, and I was in love with the color to begin with, I think that’s what got my attention at first. A Tiffany Taffy, that’s what I’m calling it! I won’t post the recipe and instructions here because it’s a little on the dense side. Thankfully I asked my mom if she would help me make them.
First, we added the sugar and corn syrup and such in to the saucepan and let them melt together while stirring them. This is typical for candy making. We heated them to about 250, not 256 like the recipe says and I’m glad we did. If we had left them in the pan any longer than the candy would have been too hard to pull apart. Mom buttered two glass bowls and once the mixture hit 250 I poured half in one bowl and half in another. I used Wilton’s food coloring since I had some from when I made my rainbow cake. I used orange and pink for my Wild Orange and Cinnamon flavors. I used my doterra essential oils to flavor the taffy and just added 3 drops each since I didn’t want the flavor to be too overpowering. Looking back, another drop or two would have been ok.
After coloring and flavoring each mixture, Mom and I scooped the mixtures out turning them over in the bowl to simultaneously cool them and help pull them. After about 10 minutes of this I was able to butter my hands and pull out the taffy and start pulling them.

Pulling the taffy.
This was the fun, stress relieving part. It so much fun to just have this candy in your hands and pull it apart and bring it back again. We each pulled and stretched our taffy for about 20 minutes each so it’s a really great stress reliever. I even said so as we were doing this. Once the taffy became harder to pull and wasn’t translucent it was ready to be cut. I sort of rolled it out with my hands and into a long rounded circle like a snake and cut it up ready for wrapping!
They were not too difficult to make, tasty and very much taffy! Sababa! My next and final challenge is Lavender Honey Ice Cream!
Bon Appétit!

Ready for cutting.

Pieces of pretty taffy!

Pretty Taffy

My Taffy, the final product
Three Day Challenge of de-stressing and new recipes.

Turkish Chickpea Cookies
With everything going on in life that stresses me out and makes me feel like I’m not doing what I should be, I was given a three day plan to de-stress. I then gave myself a three challenge, and what helps me to unwind and let go of the stresses in my life; running and trying new recipes.
Day One was Friday and seeing a Chickpea Flour Cookie recipe on Pinterest was my first challenge. I already had the chickpea flour from another recipe and the rest of the ingredients. I did not have whole wheat flour so I subbed regular all-purpose flour. As I was making the cookie dough I did notice that the amount of liquid was not enough to create an actual dough so I had to add probably about 3-4 tablespoons of water to get it to a dough consistency. I took about a tablespoon of dough and rolled them in to balls. Here’s where it became fun and I just let my mind wander and let go of everything as I dipped each cookie in to lightly whisked egg whites and then in to either powdered sugar, cocoa poster and chia seeds. You can see below what they look like post-dipping and pre-baked.

Chickpea dough cookies
After dipping and coating the cookies I placed them in the fridge to chill out for an hour and then in to the oven they went for 10-12 minutes at 350 degrees. The cookies weren’t that sweet even though they have powdered sugar in them. The best one’s were the powdered sugar and cocoa ones. I think the next time I try these I’ll add more sugar, maybe some honey and see how that works out. Overall this was a good day, I was able to unwind while making the cookies and had dessert all in one!

Baked
Today’s challenge will be posted later, my assignment: saltwater taffy!
Bon Appétit!
Banana Cream Pie……almost…
Well, this blog is about my trial and error experiences with trying out new recipes and here is one that definitely was a flop. I really wanted a to make a pie. I typed it in to my Pinterest search bar and started pinning pies, not too many just enough to give me an idea of a few different types of pies, cream pies, fruit pies, special crusted pies etc. I found an old-fashioned banana cream pie using a pre-made crust, which is fine, I was really focused on the banana cream part anyway.
So the process was fun, I scalded the milk. Which by the way I have never done. What is scalding the milk anyway?? I googled ‘how to scald milk’ which told me I needed to heat the milk over low to medium heat so as not to heat it too quickly but bring it to a hot temperature. Ok so I scalded my whole milk, added it to the pot with the sugar, flour and salt and heated that as well. I had lightly beaten my yolks and tempered them before adding those in to my hot pot of liquid ingredients. While that went on I had baked my frozen crust and let it cool. I sliced one banana and layered it on the bottom of my crust. I was also boiling a can of sweetened condensed milk to make caramel sauce but knew that was going to take longer than the whole pie.
After letting the liquid cool with everything mixed in I poured it into the crust. I have extra filling so I filled three small cups for pudding. I put them all in the fridge to set overnight and they looked beautiful!
So here I am this morning going to have some pie as an early Monday morning breakfast snack with my protein shake, don’t judge, and as I cut myself a piece of pie, it’s not really set and pours over the crust and my plate as a big mess of runny yumminess….
This was definitely not a sababa experience, I have yet to figure out why my pie was not actually a pie….
I enjoyed making it however which is always 95% of the fun of a new recipe. I love just putting away the trials of the day, the stress, the blah and just escaping in a recipe, in something new. I can leave myself behind and just create something with as few or as many ingredients as necessary. I will figure out a banana cream pie and it will be delicious and set! Below are the pretty photos that fooled me in to thinking I had actually created a pie. However, as Julia said:
“This is my invariable advice to people: Learn how to cook- try new recipes, learn from your mistakes, be fearless, and above all have fun!”
― Julia Child, My Life in France


Pancakes in 2 Ingredients – Boom!

Two ingredient pancakes for breakfast.
I was having a girlfriend over for breakfast about a month ago and she’s trying to be gluten free. I came across this blog through another post on Facebook and thought it was pretty cool! She made pancakes, and they were gluten free, and they only had TWO ingredients! Say what? Yes, just two ingredients and you can make pancakes too! You combine 2 eggs and one banana and BOOM! Pancakes.
I was blown away and didn’t think that these could possibly taste all that great. But we decided to give it a try. I mashed up a ripened banana fairly well and then added in the eggs and beat those in with a fork as well. It turned in to this little bowl of batter and I was surprised. My friend and I both looked at each other and said, “That looks like as good as it’s going to get for gluten free batter.” I poured it in to the pan after I had heated up some coconut oil and before my eyes the batter turned in to pancakes! I made the first few batches plain, then added some plan low fat yogurt and blueberries to the last batches.
I have to say that I was pleasantly surprised! I served the vanilla chia seed pudding with raspberries, a baked peach and mimosas with the gluten free pancakes for breakfast and the meal was delicious. This was an easy, healthy, gluten free, protein packed pancake that really tasted good. I have to say that adding the yogurt really helped to add to the fluffiness and thickness of the pancakes but they were still more like crepes. I think with one batch we were able to make almost a dozen pancakes which was fine between the two of us. This recipe and entire meal was definitely sababa!

2 regular pancakes

2 blueberry pancakes
Head to your kitchen and get cooking!
Bon Appétit!
Chia Seed what??? Pudding!

Chia pudding topped with raspberries, gluten free pancakes and a baked peach
I know this recipe can be found all over the Interworld but it’s new to me. I came across this recipe when I saw someone on Instagram post that they were making this. I quickly went to Pinterest to find it, cause that’s where you go to find any recipe after all. Pinterest is my Google for recipes, all recipes. Once I found this I created my shopping list and picked up my ingredients on my next shopping trip.
I measured out my chia seeds, poured them in the bowl and then added an entire can of light coconut milk and some vanilla. After mixing it all up with a whisk I placed it in the fridge for 2 hours to set. Once it had set I added some honey to it just to give it a little sweetness, spooned some pudding into a nice little bowl, added some raspberries on top and voilà! I have come to love, love, love this recipe for many reasons: 1. it is just the easiest thing in the world to make, 2. it tastes great, 3. it’s absolutely healthy for you! and 4. You can jazz it up any way you like.
Here’s a little bit of info about chia seeds and their health benefits:
They increase your energy.They’re high in protein, fiber (1 oz has 11 grams, a third of your RD amount), calcium, antioxidants, and omega-3s.
They can aid in slowing digestion and help prevent blood sugar spikes.
Helps to lower cholesterol, blood pressure and blood sugar.
Contains calcium, magnesium, manganese, iron, phosphorous, folic acid
High in Omega-3, important for brain health.
Helps you maintain healthy bones and teeth, which translates to fewer Dr. visits!
Contains tryptophan, which helps to regulate appetite, sleep and improve mood.
Here’s the recipe if you’d like to give these awesome little seeds a try! They’re great for all ages, young and old alike! The above photo includes gluten free 2-ingredient pancakes, more on that in another post.

Ingredients
1 cup or can of light of full coconut milk
1/4 of chia seeds
1 teaspoon of vanilla
honey to taste (after it’s set, optional)
toppings (fruit, nuts, coconut milk whipped cream)
A New Year, A New Chocolate Cake

Julia’s Reine de Saba Chocolate Almond Cake
There’s nothing like a Jewish New Year to get you in the mood for resolutions and trying new things. Last week was the Jewish New Year and among other resolutions I committed to trying new recipes and especially the one’s that scared me just a little. I made an apple pie for Rosh Hashana dinner, that post will come later. My friend Molly was having a few people over to celebrate her new house that she and her husband just bought.
Immediately after being invited I knew I wanted to make something to bring for everyone. I originally wanted to make these quinoa chocolate drops being that they were on the healthier side but since I really wanted a challenge, and given that I had just rewatched “Julie and Julia” again I decided to tackle Julia Child’s Reine de Saba! This was perfect, it was sweet which in Jewish tradition you bring something sweet for an occasion like this, and it was a Julia recipe I had on my list of recipes to make. I wanted to bring something I made and put effort and love into.
I began with the cake, and found the recipe on Pinterest which went to the full recipe here. I followed the full recipe which was a little bit of a process but fun. While making the batter and adding the butter and the cake flour I just sort of got lost in all of it really enjoyed the whole experience. I buttered my cake pan and poured the batter in and put it in the oven to bake. When it came out I was a little surprised at how thin it was, but I let it cool and went off to do something else. Later that night I decided to make a second cake and have a two layer cake. The second cake took much less time since I already knew what I was doing and somewhere during the making of that second cake I realized, ‘Hey, this isn’t so hard, it’s actually pretty enjoyable and relaxing.”
The next day I made the frosting which turned out to be amazing, who doesn’t love chocolate and butter and Rum? Well, as you can see the final result above the cake turned out amazing and everyone loved it! This recipe is definitely a keeper and one to be made again. It was absolutely sababa!
A new year has begun. A new challenge conquered! As Julia said, “No one is born a great cook, one learns by doing.” I will continue to learn and do and challenge myself with the recipes I make. I want each and every recipe I cook to be filled with as much love and heart as I put in to that incredible cake.
Bon Appetit!
A Day We Will Never Forget

NYC #neverforget
I can still remember hearing on the radio as I was getting ready for school, the disbelief of what was happening…I was 17 years old, a Senior in high school and that morning is a morning I will never forget. I quickly turned on the news and there it was, a plane had flown in to a building, the World Trade Center Tower, and then as I kept watching a second plane…I was in shock, I couldn’t believe what had happened either. That day was somewhat of a blur, many teachers let us watch the news in class that day, no one could turn away. I remember in the days that followed that teams of firefighters and policeman and anyone that could help, they were organizing caravans to go out and help in whatever way they could.
As time passed and stories unfolded I can remember hearing stories of kindness, of people helping each other, waiting for help to come, and the overwhelming support for the servicemen and women and volunteers helping to clear the debris and find survivors. The tapes of final phone calls from United 93 coming out with messages to the passengers loved ones. I remember all of that, the stories of love and kindness and support. As long as we remember and continue to pass on the story of what happened and then the love that followed, we will never forget and always remember. That would be sababa.
